For communities that require authenticating users against a GitHub organisation or team, we instead use the native JupyterHub OAuthenticator.
Get admin access to the target organisation
To more easily facilitate setting up this method of authentication, the engineer responsible for deploying the hub should have admin access to the organisation the Community Representative(s) want to use to manage its members.
We ask for this permission because, if the Community Representative doesn’t grant permissions to the OAuth app during the first login, all subsequent users will be see a 403 Forbidden error when they try to login and correcting this can involve a lot of back-and-forth between us and the Community Representative.
This process is a lot more streamlined if we have the power to set this up ourselves.
Please ask the Community Representative on the “New Hub” issue to grant you admin access to the org before setting up this infrastructure. You can remove yourself from the org once you have confirmed that login is working as expected.
How-to setup GitHub auth
Create a GitHub OAuth App. This can be achieved by following GitHub’s documentation.
Create a new app inside the
2i2c-org.When naming the application, please follow the convention
<cluster_name>-<hub_name>for consistency, e.g.2i2c-stagingis the OAuth app for the staging hub running on the 2i2c cluster.The Homepage URL should match that in the
domainfield of the appropriatecluster.yamlfile in theinfrastructurerepo.The authorisation callback URL is the homepage url appended with
/hub/oauth_callback. For example,staging.pilot.2i2c.cloud/hub/oauth_callback.Once you have created the OAuth app, make a new of the client ID, generate a client secret and then hold on to these values for a future step
Create or update the appropriate secret config file under
config/clusters/<cluster_name>/<hub_name>.secret.values.yaml. You should add the following config to this file, pasting in the client ID and secret you generated in step 1.jupyterhub: hub: config: GitHubOAuthenticator: client_id: CLIENT_ID client_secret: CLIENT_SECRETIf not already present, add the secret hub config file to the list of helm chart values file in
config/clusters<cluster_name>/cluster.yaml. If you created theenc-<hub_name>.secret.values.yamlfile in step 2, add it the thecluster.yamlfile like so:... hubs: - name: <hub_name> ... helm_chart_values_files: - <hub_name>.values.yaml - enc-<hub_name>.secret.values.yaml ...Edit the non-secret config under
config/clusters/<cluster_name>/<hub_name>.values.yaml, making sure we ask for enough permissions (read:org) so we know what organizations (or teams) users are a part ofjupyterhub: custom: 2i2c: add_staff_user_ids_to_admin_users: true add_staff_user_ids_of_type: github hub: config: JupyterHub: authenticator_class: github GitHubOAuthenticator: allowed_organizations: - ORG_NAME:TEAM_NAME - ORG_NAME scope: - read:orgRun the deployer as normal to apply the config.
Granting access to the OAuth app
Once the OAuth callbacks have been set up following the steps above, you need to grant access to the OAuth app that we have created.
The first time that you log on to the hub with this authentication set up, you will be presented with a page that asks you to grant access to various GitHub organizations. For each user, GitHub will list all organizations of which they are a member.
Organisations with a green tick next to them already permit the app to read their data
Organisations that you are a member of (but not an admin) have a “Request” button next to them. This will notify the org admins to grant access to this app on your behalf.
Organisations that you are an admin of will have a “Grant” button next to them
If you have already logged in to the hub prior to adding the organization authentication you can perform the grant on the Authorized Oauth Apps tab of your accounts GitHub Applications Settings.
You must grant access to the organization that is added to allowed_organizations in the config, but do not need to grant access to any other organizations.
In this case, “granting access” only means that the JupyterHub can view whether a user is a member of the GitHub organization.
For example, see the image below for how we would grant the nasa-cryo-staging OAuth app access to the binderhub-test-org.
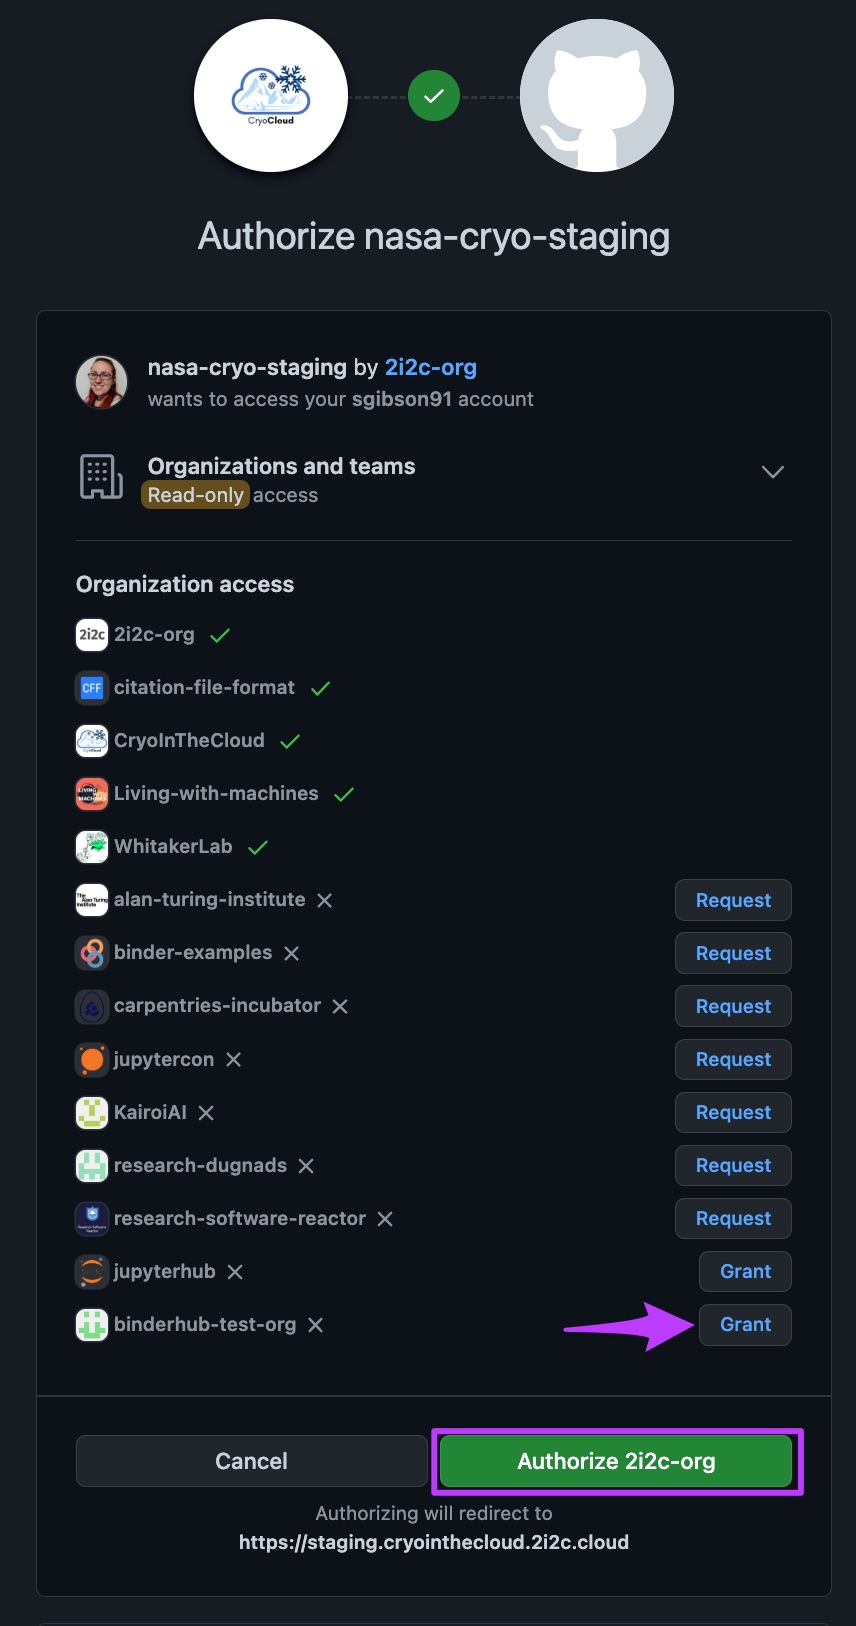
How to grant org access to an OAuth app on GitHub
Once you have confirmed with the Community Representative that users can login, you can remove yourself from the org.
Restricting user profiles based on GitHub Team Membership
KubeSpawner supports using profileList to give users a choice of machine sizes and images to choose from when launching their server.
In addition, we can allow people access to specific profiles based on their GitHub Teams membership! This only works if the hub is already set to allow people only from certain GitHub organizations to log in. See Restrict profile options based on JupyterHub groups (or GitHub teams) for more information.
Enabling team based access on hub with pre-existing users
Users already logged in to JupyterHub needs to be forced a re-login for access
to /hub paths, otherwise they may be presented with too few server options or
an opaque ‘Access denied’ error when visiting /hub/spawn.
Forcing users to re-login to JupyterHub isn’t influencing users access to
running servers at /user/my-username, it will just lead to a quick restart of
the hub pod, also without disrupting the proxy pod.
By doing the following steps, pre-existing users should see the server profiles they have access to:
Force a re-login on next
hubpod restart by deleting an auto-generated cookie secret for JupyterHub (hub.cookieSecret) stored in a k8s secret under a specific key-value pair.deployer use-cluster-credentials <cluster-name> kubectl patch secret hub -n <hub-name> --type=json -p='[{"op": "remove", "path": "/data/hub.config.JupyterHub.cookie_secret"}]'Either deploy manually or merge your PR.
A new cookie secret will be auto-generated by the JupyterHub chart now and the
hubpod will restart, forcing users to login again.